Search This Blog

Friday, December 7, 2012

Gumbo, Quickish-style

With the onset of cooler weather, the desire for warming comfort food really kicks into gear. I happen to love gumbo, the traditional stew of the southern United States. Most often associated with Louisiana, it is actually a common dish in a lot of the southern coastal area. With as many variations as there are cooks. The most common characteristics associated with gumbo are roux, okra and filé. I decided, largely due to the okra looking bad at the market and being out of filé, to do a simplified version.

The Veggies

First step was to prepare the aromatics for the building of the stock. I went with a medium yellow onion, a small red bell pepper and three stalks of celery, along with a bunch of green onions. This is a fair amount of vegetables, but, it will all cook down and integrate into the stock. I prefer a dice on the small side for this dish.

Fried Chicken

Borrowing a technique from an old friend, I had the chance to befriend a cook that had worked at several restaurants in the Louisiana area and later in Oakland, she had a theory that roux is the fundamental carrier of color and flavor in a gumbo, and that the fat should reflect that philosophy. I learned from her, that by giving the chicken a very flavorful coating and frying it, you can jumpstart your roux. These chicken thighs were given a coating of 'red flour', a blend of salt, chile powder (I make my own, very similar to Harissa) and cayenne. Once fried to color, the oil will have a deep red color. I used a couple of strips of bacon to build the oil to fry the chicken. Yes, it is not healthy.

The Roux

For the roux, I used 1/2 cup of the 'red oil' and 1/2 cup of AP flour, and started toasting it up. Now, roux can be a lot of different things, depending on the technique and style of cooking you are doing. This is not about thickening the stock. It is about building the color and creating a toasted flavor to the stock base. The picture above is about halfway to where I wanted it to be. You can do this in the oven, but, I like to smell the roux as it is cooking. I took the color about to a brick red, but, what I really wanted was to get to the point that the roux becomes aromatic. There is a point where the roux smell will change from fat and flour to a very aromatic aroma that jumps from the pan, and yes, this is moments before it burns. I have the vegetables and 3 cups of stock, or water, ready to dump in. Just in case.

Veggies in the pool

The shot above shows the vegetables dumped into the roux, this effectively stops the cooking of the roux and allows you to control that very moment when the color is right. I was a little light on the color, no matter, the flavor was there. I also topped up with a couple of pinches of salt. I used fine sea salt for this, it just helps with the vegetables sweat a little better. After a few minutes, dump in the stock or water and let it cook for an hour or so. At this stage, as simple as it seems, there are amazing flavors that have developed, the red bells contribute sweet notes, the green onions and celery add vegetal flavors and aroma, the onion is, well, onion. The roux aroma and flavor really come through at this point, the toast adding a nice bottom note to the dish. As crazy as it might sound, water is a reasonable addition, it has solvent properties that pull the flavors together very well. After the first hour, I added the chicken thighs in and cooked them until tender, then the sausage was added, in this case a nice smoked linguica. Moments before serving, some shrimp were added.

Look at that color

The color worked out fine, and the choice of steamed Basmati rice was a sound decision. A note about the meat and ingredients. All of the vegetables were organic, I have taken to using organics for root and stem vegetables. I feel they seem to cook better and I like that I can feel comfortable about the food I am eating. The meat was pastured chicken, locally made sausage and wild caught USA shrimp, as I feel the texture and flavor is just a lot better than the farmed stuff. It does cost more, I just eat a little less.

This did not suck

Yes, this type of cooking required that I pay attention for short periods of time over a three hour length of time, and it is nice to be able to work at home to pull off a cook like this. However, there is no way you can find something like this in the store. And three hours or so, not so bad for a pot full of wonderful complex eating. The okra and File were not missed.

Wednesday, November 7, 2012

Pig Candy BLT

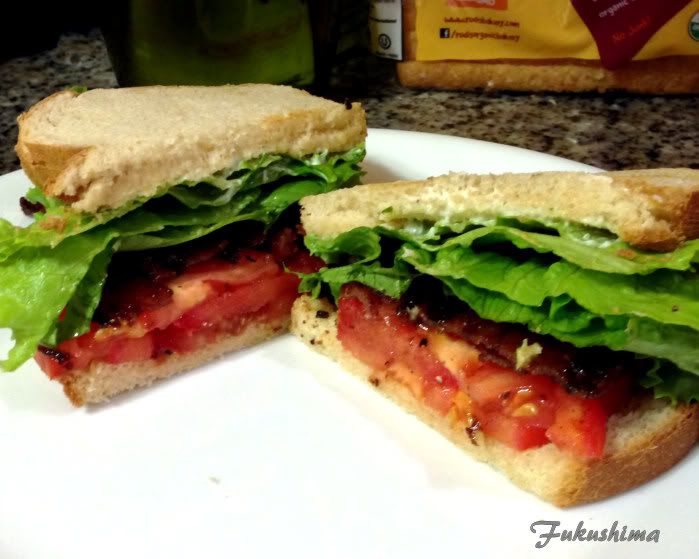
It comes to the end of the season that I can get reliable, organic, field grown tomatoes from local sources, and I wanted to send out the last of the decent tomatoes with a fitting meal. That would be the ultimate use of a good tomato, the BLT. But, wanted to dress up the sandwich a little, so I bought some bacon and made Pig Candy.

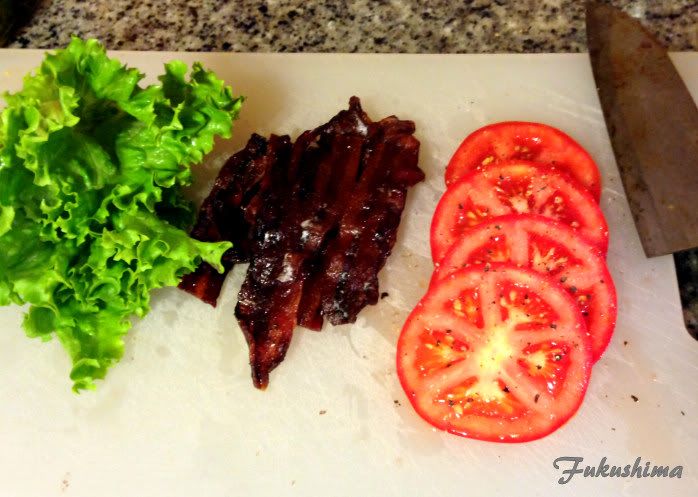
For those not familiar with Pig Candy, it is simply bacon that is coated with spices and sugar, sometimes some chopped nuts, and then smoked or roasted until the sugar caramelizes and the bacon crisps up. I used an uncured bacon product (less sodium), thin cut and figured three slices would do for each sandwich. I wiped a little maple syrup onto the bacon, then a light coating of cinnamon, allspice, nutmeg, chile de arbol powder and a little brown sugar. I prefer a more savory and less sugared version of Pig Candy than most folks, I really want the bacon to shine with the sugar just behind it.
 
Green Leaf Lettuce, Pig Candy, Tomatoes

This was piled onto a couple or warmed slices of Rudi's Soft White, which is not really soft, or really white either, as they are an organic bakery that uses whole grain normally. I just could not bring myself to buy the Wonder Bread.A swipe of two of mayonnaise on the bread and assembly, simple as making a sandwich.

The Sandwich

I am gonna miss fresh tomatoes that do not have a skin like vinyl and a core made of balsa wood. Winter is the time for canned tomatoes anyways. I would like to say I only ate one, that would be lying. The Pig Candy provided the textural and fatty character of bacon, along with a nice sweetness and spice that added to the sandwich nicely. I won't do this often, but, it was a nice upgrade.

Monday, November 5, 2012

Ribs and Brisket

A Tale of Two Cooks...

I was tasked with cooking two briskets, one for eating, one for leftovers. Seemed simple enough, yet, when I checked out, a cryo of spare ribs had jumped onto my cart. No matter, I would have a 26" Weber kettle and a Medium Big Green Egg to cook on, I could handle this.

Cook 1: St. Louis-style Spare Ribs
1. Clean and trim ribs, wash thoroughly, scrape meat and dry.

2. Rub was my one of a kind, Leftover Blended Rub, where in Simply Marvelous Cherry and Simply Marvelous Spicy Apple rubs end up blended with the remnants of my Brisket Rub, no proportions are available.

3. Run is applied to each rack, then the racks are stacked and wrapped in plastic wrap, wrap tightly and let sit at room temperature for two hours. The ribs must be wrapped and must be let to sit for at least two hours, and not more than three hours.

4. Fire cooker (Wicked Good and apple wood) and get set to around 285F, apply a second coat of same rub to ribs and place on cooker as soon as it is stable. Allow to cook for at least 3 hours, then test for bend. They won't be really ready, but, close, you are looking for the point where they bend about 45 degrees when held on one end. Then move on to step 5.

5. Apply Pig Honey, in this case, I used version 4+, this is squirted from a soda bottle with a couple of holes punched in the cap. You don't want to use a spray bottle, it needs to soak the meat.

Pig Honey Version 4:
3 cups water
handful of trimmings from previous brisket and butt cooks (needs to be smoked barky parts)
1/4 cup Red Boat Fish Sauce (Worcestershire sauce or Coconut Aminoes work too)
1/2 cup Agave syrup
1 tablespoon rub
1 teaspoon hot sauce

Simmer everything until color is that of a dark broth. Taste should be complex sweet, finishing clean.

Apply the Pig Honey three times during the last 45 minutes of cooking, soaking the meat each time, with the last application no more than 5 minutes before pulling. No foiling or paper.

6. Remove from heat when racks bend 90 degrees, or twisting of bone is acceptable. Place in an oven pan and cover with foil for 10 minutes or so. The ribs should slice easily at this point, with a durable sweet/spicy flavor at first bite.

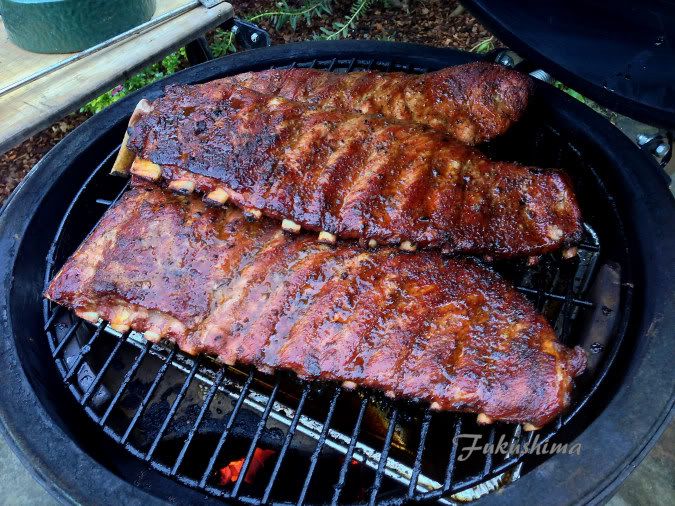
Just before pulling from cooker
This cook ran at around 300F, and about 4 hours. I do not monitor cook temperature once I put the meat on. I listen for the meat sizzling on the drip pan, as long as I hear sizzling, I make no adjustments. Once it hits the 285F, I don't make any more adjustments, but, when I finished, I wanted to move some more meat onto the BGE and I found it was right at 300F.

The Brisket:
1. The brisket was washed, scraped and dried, and moved to a dry service tub.
2. The brisket received a simple version of my Mother Rub. This rub is focused on providing a complementary seasoning to the meat.

Brisket Mother Rub:
3 parts Redmond Real Kosher Salt
2 part fresh ground black pepper, medium grain
1 part ground chile powder (not chile powder from store, this is just Chile de Arbol powder)
1/4 part lime powder
1/4 part fine Turbinado sugar

3. Apply rub generously to brisket, let sit while cooker is started and brought to temperature, around 30 minutes to an hour.

4. Put meat on pit, fat cap and point towards heat source. In this case, it was a kettle, so the points faced the offset fire, the cap was down. I let the meat run.

5. The kettle was kept at a minimum of 280F and a maximum of 325F, I didn't fuss too much, kept an eye on the Maverick, since I have not cooked on this kettle before. Fired with Wicked Good lump, Natural briquettes and apple.

6. At three hours, opened the cooker, looked for color, it seemed okay, so I wrapped them in butcher paper, two layers, and splashed a little jus that I had made onto the paper before wrapping up. Back into cooker. Here is where things went oddly.

7. At five hours into the cook, I expected it all to be done, not even close. I picked up the first brisket and could tell by feel it was still in the stall. Same case for second brisket. At seven hours into the cook, I could tell the points were done, but, the flats were not. I separated the flats, put them on the BGE at 300F, took the points in and let them rest in a 175F oven. The smaller flat got done after another hour, the larger flat took another 2 hours. Fortunately, the smaller flat and point were done for dinner.

Plated
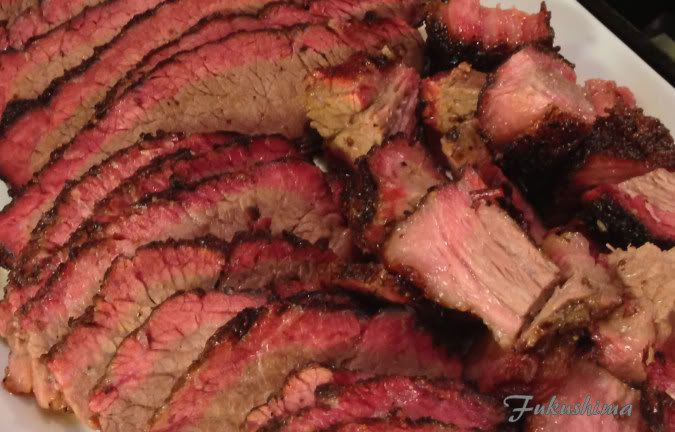
 There were flat slices, point slices and what I consider to be burnt ends, which is to say the parts of the point that I carve off the ends, which I cut into chunks. Not one piece of meat was sauced. The chunks of burned edges were meltingly tender and required no sauce or additional cooking. The sliced flat was tender and had just enough moisture, truly some of the best flat I have had in a very long time. All of the slices were dipped into a jus I made while things were cooking.

Brisket Jus - Platy style:
4 cups water
2 cups chopped fat and meat from brisket trimmings
1 cup chopped cooked brisket trimmings from previous cook
2 tablespoons rub
1 teaspoon Agave syrup
Bring to simmer and hold until liquid takes on a dark brown color and fat render. Filter and reduce by 1/4. Use to dip meat after slicing.

Here is a close-up, hopefully the texture of the meat shows in this shot.

Sliced flat, point and burnt ends

You'll notice that there is no mention of internal temperatures throughout the brisket cook. I am not hiding anything, I did not check the internal temperature of the meat, and did not use any timing to determine completion of the cook. I relied upon the heat to get the meat done, opened at times when I felt is smelled right, or when I felt the meat should be close. To determine time to pull, I relied initially on feeling, squeezing the flat and point through the butcher paper, soft means ready to check with a probe. Hard means stall, sort of gives means I should pay attention in another 30 minutes.

Brisket Trimming

And now for an odd little food post, one I feel is quite overdue for this blog. How do I trim a brisket?

I think the idea of smoking a brisket is one of the more intimidating aspects of cooking in the smoke. While there are many cooks who think nothing of cooking a pork butt or some racks of ribs to be something of a natural and easy task, the brisket often stands apart was the intimidating cut of yore. Only brisket masters need apply blah, blah, blah...  As is often the case, the truth is, the same principles apply to either and any meat you are cooking.

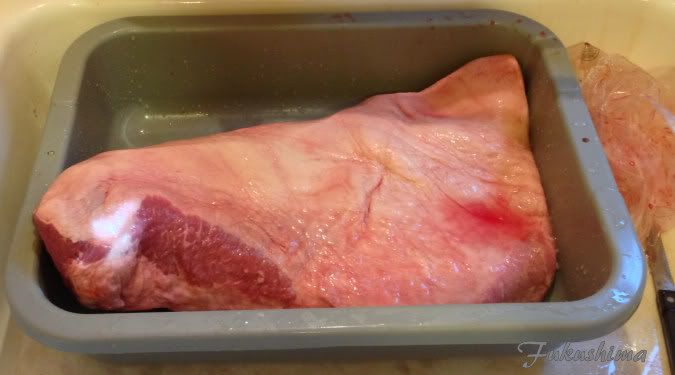
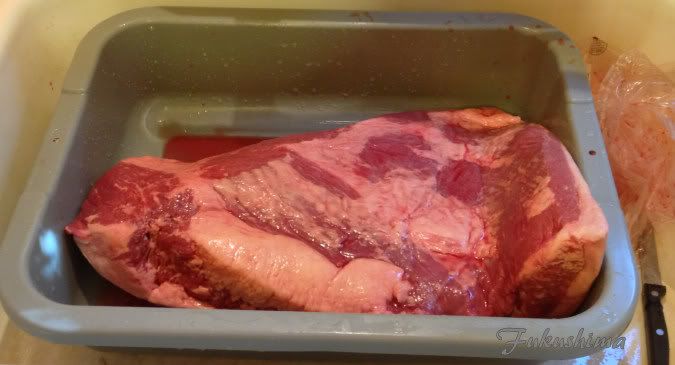
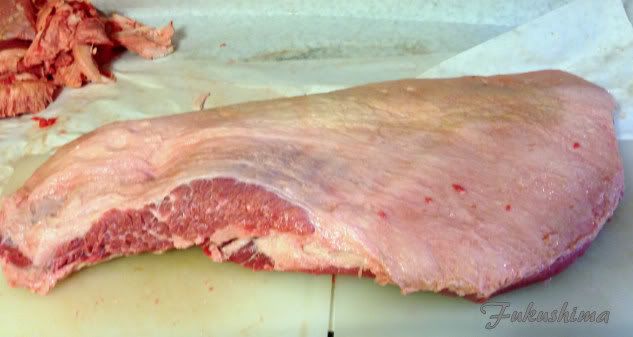
Here then, is subject one, what is known as a packer brisket, fresh from the cryo-vac. This was an IBP brand, select grade, whole packer (with a poorly butchered point), original weight around 14.9 pounds.

Fat Cap Up, Untrimmed

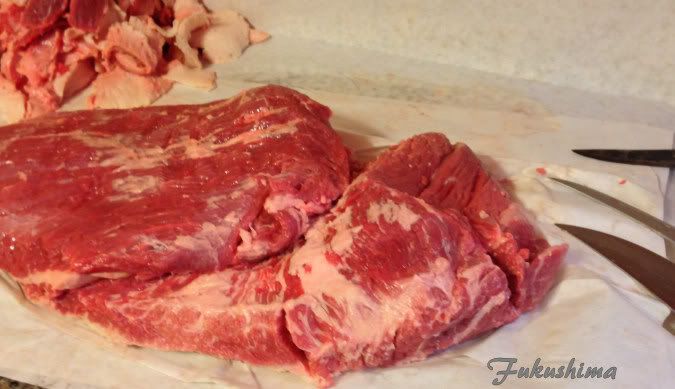
Fat Cap Down, Untrimmed

Step one for me, with any cut of meat, is to thoroughly wash and scrape the meat. The idea is to wash the liquid that seeps from the meat while it in the plastic, also, scraping will remove any bone dust or chips. From here, I shake off any excess liquid, and using a clean dish towel, wipe  the meat dry. Meanwhile, I like to put a layer of two of butcher paper down, and get the knives ready.

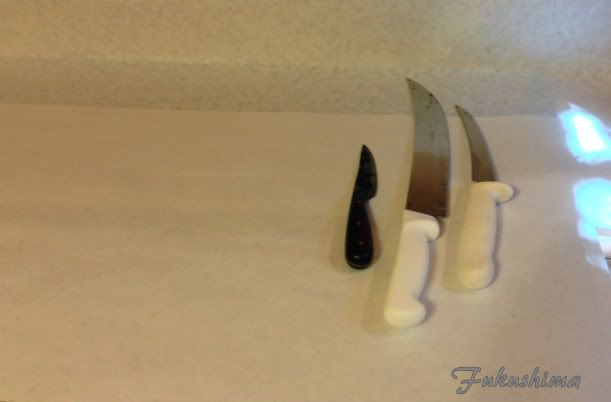
Knives
I use three knives, a small caping knife, for detailed cuts, more than anything, this knife has become like an attachment to my hand, I can use this knife for all manner of cleaning cuts. The large Scimitar is a favorite for cutting and slicing large cuts of meat. I use it with a push cut, allowing the large up-swept blade to slice through the meat, think the bow of a ship, used in this manner, a Scimitar or Butcher's knife will effortlessly slice through the thickest meat. It is not a great pull-cut blade. The small stiff-blade boning knife is what I use to clean fat and membrane, I find this knife to be invaluable for preparing all types of meat for cooking. Onto the meat.

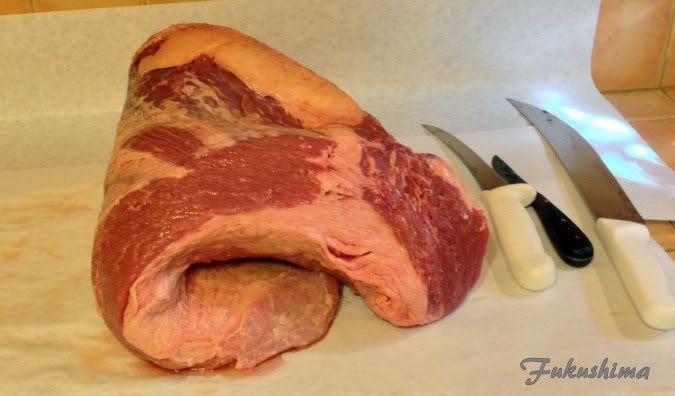
Flop!
 I like briskets that bend, this one bends nicely. If you're thinking the meat is so long and flat, it has to, nope. This brisket had a flat that was almost 3 inches thick. The point was poorly sliced and almost 1/3 of it was missing. I check each packer in the store, looking for one that is flexible, even floppy. Even though these are Select grade, I know I can turn a brisket like this into good eating. I like to trim the underside first, no reason, just do it that way. I try to remove the membrane, any fat and the wedge of fat between the point and flat. Not everyone believe this is a good practice, but, I feel the wedge of fat makes for greasier meat, adds no additional food to eat and changes how the heat interacts with the meat where the point and flat meat.

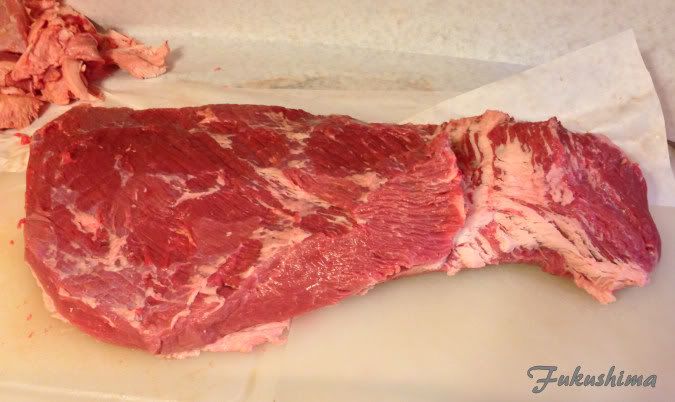
Trimmed 
Here, you can see the brisket, lean side trimmed, most of the surface fat has been trimmed, the wedge of fat removed, edges cleaned up. I stretched the brisket out a bit, to show the flat, on the left of the image, and the point, on the right of the image. One additional thing to note, I have shaped and trimmed the edges of the brisket to a thicker edge, most packers have very thin edges, these are hard to get cooked correctly and leave the edges dry. By blocking or rounding the flats edges, I get a better overall texture. Next!

Fat Cap, trimmed
The above image, which shows the poorly cut point in all of it's glory, also shows that the entire fat cap has been trimmed, down to no more than 1/4". I know it looks like it is down to membrane, but, once cooked, that will leave a thin cap of fat, just enough to moisten the bite. Now, I would note, that this brisket was intended for the table, so I did minimal trimming of lean, just removing the discolored meat. For a competition, I would trim the flat to a width of around 10" with the grain, to try and get the slices to fit into a 9" clam shell. Oh, and there was a second...

No fat cap shot, look at the marbling

Again, you can see the overall clean trim of the flat and just a little surface fat left on the point, which shows that there is still a fair amount of marbling, even in a select packer. As you can see, this packer had a very full point, which is something I consider to be a desirable trait in a brisket. Much of the flat on this packer was protected by that large point, it made positioning over the fire easier. I think the flat ends up more tender, and with more moisture as a result.

All of this trimming is really just to take a good piece of meat and make it easier to cook. Learning how to pick out a good packer, learning which kind of cut you want and how to prepare it are more important, but, preparing a brisket this way, leaves you with more edible meat, with a lot of surface and minimal surface fat.

Sunday, September 2, 2012

Hot and Fast Ribs

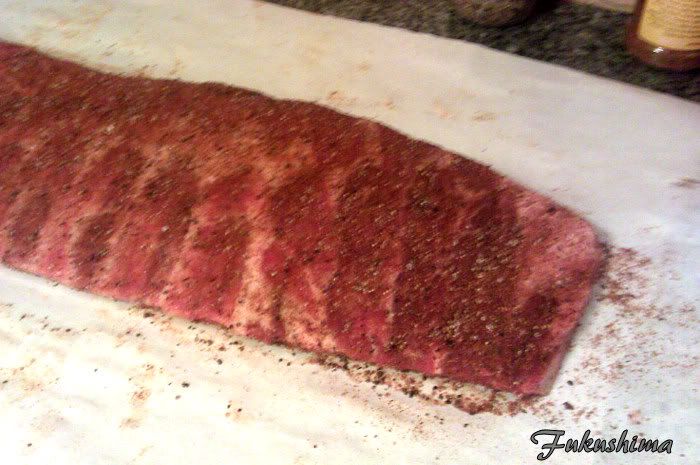
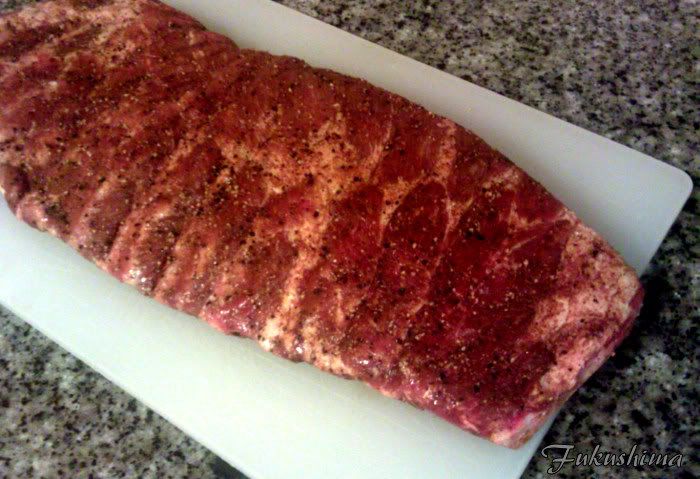
It was experiment time again, and the Landarc BBQ kitchen was to test out the idea of cooking ribs at a much higher temperature range than I normally do. This is in keeping with my working with hotter temperatures across the board, largely inspired by Donnie Thomas down in Texas and Mark Redman in Georgia, the two men who introduced me to hot-n-fast for brisket. The ribs were from Beeler's Pork, which uses their own hog breed they call Haluka hogs, this is some good pork, always full of flavor and well marbled. I hit it with some Dizzy Dust salt-free and then a higher sugar variation of Bob's Mother Rub to get a little more black pepper and some salt. Here they rack is ready to go.

The rack rubbed up

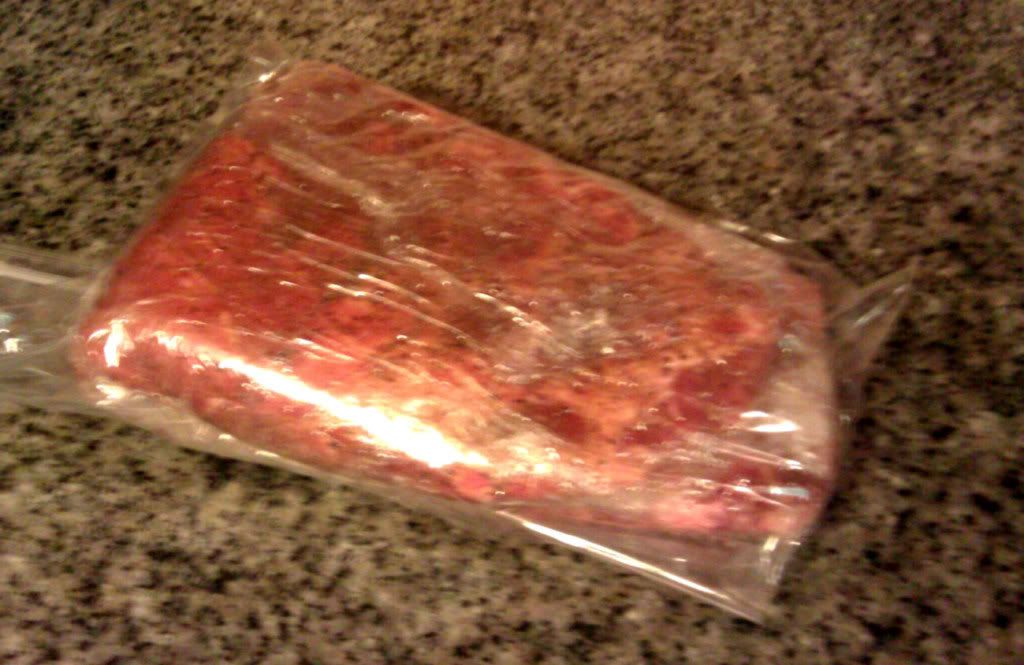
This was actually done 24 hours prior to the cook, as I was messing around with getting more flavor into the meat as well. I decided to let it sit, tightly wrapped overnight and to see how much liquid was in the wrapping the next day. There was no liquid in the wrapping at all. I still believe there is no truth to the idea that rubbing with a rub the night before leads to dry ribs.

Here are the wrapped ribs

The ribs were pulled from the rather dry wrappings, allowed to sit at room temperature for 20 minutes or so, while I got the kettle going, I decided to shoot for 300F as a target for this cook. The ribs went on at 300F, there was a little bit of apple wood over Wicked Good lump charcoal. You can see that the rub has changed the color of the meat quite a bit.

Ribs cured in dry rub overnight

From here, it was really rather easy, I let the kettle go, it ran along just fine at 300F up to 325F, where it finished. The ribs were done in around 3 hours and change, and the color was excellent. I strive to have this color and texture at lower temperatures and rarely get it this nice.

Yes, they did look that good

This is exactly the color I want when I cook ribs, and the fact that I was done at just a little over 3 hours, amazing to me. There was weep, the Pig honey, all over these ribs. Note, I did not spritz or mop, this was all about a sprint of a BBQ cook.

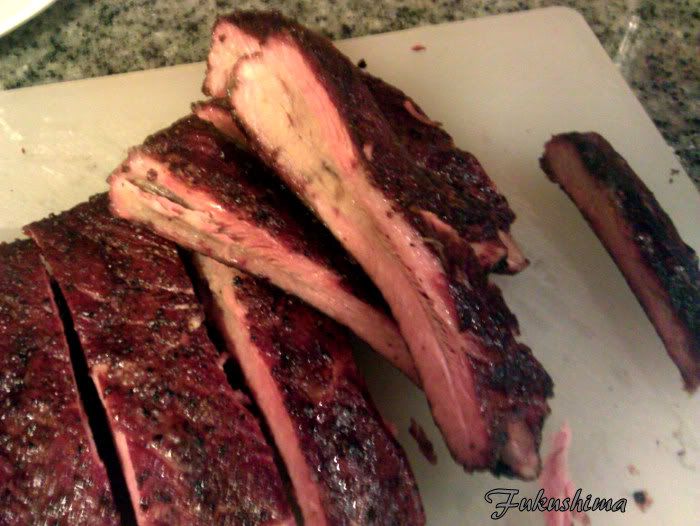
Clean cuts, smoked through

There was nothing about these ribs to suggest that there were any shortcuts taken, these had a wonderful smoke flavor, the rub had worked into the meat, they were juicy and the surface had a tender bark, bit through to the very definition of the word. I had gotten lazy and did a modified St. Louis cut, which is to say, some of the tips were left on. Still, these ribs were as good as I would ever need ribs to be. (again, I apologize for the pictures, phone camera, what can you do?)

Sunday, August 19, 2012

Steak Night

Well, I decided it was to be steak night, this had a lot to do with the fact that I had gotten home from a week of camping and had so much in terms of vegetable matter than had to be consumed, that I spent Friday and Saturday eating mostly vegetables at home. I figure, I am allowed a nice juicy steak. There were not a lot of preparation pictures, as I figure, it is just not that tricky to prepare a steak.

Since I spend much of the past week eating food cooked over a fire, I had little taste for more smoke, so it was to the cast iron pan, ripping hot, dry and ready to go. I oil and salt the steak, no pepper, then into the cast iron pan. Seared for 2 minutes a side and pulled to rest.

Steak resting

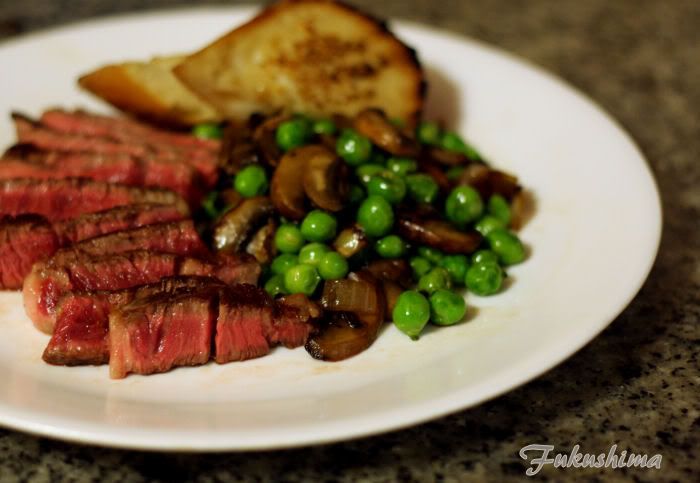
I has some fresh English Peas and decided the classic of Peas and Mushrooms for the steak was a good route. I sauteed up some onion, added the mushrooms and a little butter, rasied the heat to drive off some liquid and char the onions a bit. Oh, about the butter added after the onions, I use grapeseed oil to saute or fry, it is very high heat stable. The butter is just for flavor. In any event, the peas were added for just a few minutes to heat through, but, barely cooked.

Yes, I meant for the onions to be that color!

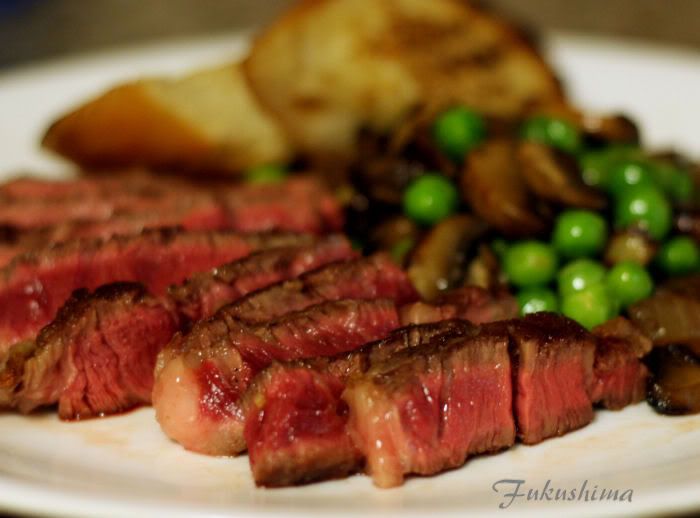
I ended up slicing the steak, and eating just 1/2 of the steak, it felt like a better portion and let's face it, I need better portions. There was a little garlic bread points to finish the plate. Here is a close-up of the meat, as I figure nobody comes here for the peas.

Too red? NO!

For me, this is a perfect rare-medium-rare, I really prefer these steaks on the just rare side of medium rare. The cast iron pan did it's job, putting a nice crust onto the steak, just enough to complement and caramelize the surface. A little black pepper after the rest, so there is no bitter, burned pepper smell or taste. Perfect dinner.

Friday, August 3, 2012

Summer comfort on a Friday

Somedays, when things have just not quite gone right, such as angry clients telling you to get a problem fixed and you are the guy standing in front of the delay, by Friday evening, you want some comfort. Now, I am not against a beer or three, and Fridays often find me practicing my mixology. But tonight, was to be different.

I went with this...


Comfort, why yes, I'll have some please...

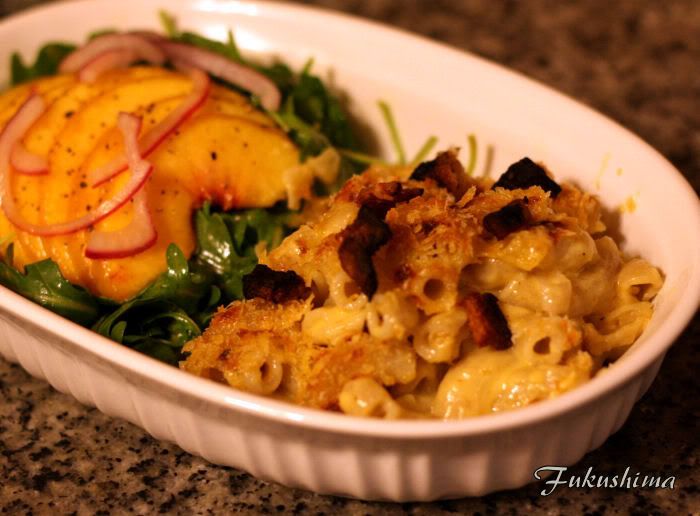
What you see here, is a simple four cheese macaroni featuring my favorite cheese, Bellweather Farms Carmody, with a little cheddar, parmesan and emmenthaler. A simple roux, some white port and fresh cracked black pepper from my stash of Phu Quoc black pepper. Oh, and to top it off, there was some home made cracklins, from a few scraps of smoked bacon fat.

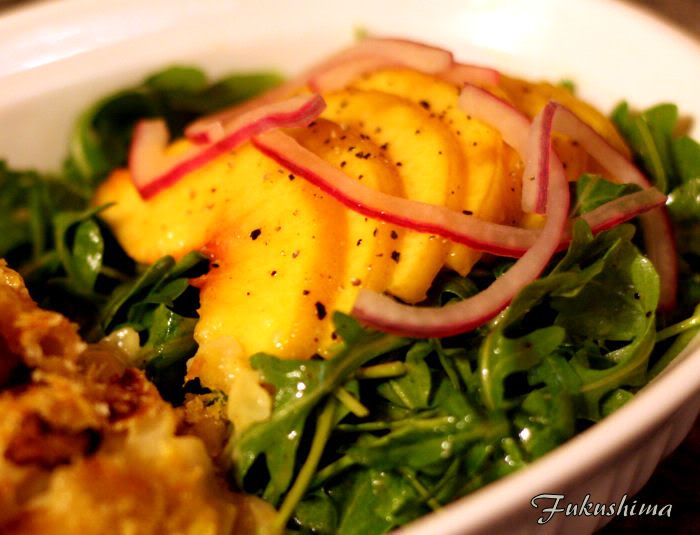
I am often asked how I would chosse elements for a plate, in this case, with the creamy, fatty flavor and soft texture of the macaroni and cheese, the complement could have been to try and match the main course, but, that really taxes the palate. I went with a contrast, a sharp one. That is a soft Elberta Peach, bridging the dish, it's soft texture and sweetness mimics the main course while not copying it.

The salad is a base of wild arugula dressed with a classic vinaigrette, kept a little sour on purpose. Very high quality olive oil and a spalsh of cider vinegar and balmsamic, the sweet and sour let's the arugula pepper work with the peach. It is also worth noting, the natural pepper flavor of arugula works brilliantly with both the peach, and the mac-n-cheese. Finally some sugar sured red onion, sliced paper thin, gives just one more layer of flavor.

There ain't no salad in BBQ!

With a macaroni and cheese dish that is anything but the blue box, something slightly crunchy, sweet and sour, soft and crunchy, it holds up the complexity of the mac-n-cheese without letting it dominate the palate.

Sugar-cured Red Onions:
A treat with any dish, I love these on fried potatoes, or with pulled pork in-lieu of slaw.

1 red onion, sliced very thin. I prefer a knife cut, but, a slicer works
2 tablespoons fine turbinado sugar
2 tablespoon fine sea salt
1/2 cup cider vinegar

Throughly blend onion, sugar and salt, let sit for 1 hour at room temperature. Drain and add vinegar, do not rinse. Allow to sit for at least one hour.

A note on the onion, I prefer small red onions, and not torpedo onions but, the flatter ones.

The Vinaigrette:
1/8 cup very high quality oil, I prefer olive oil
1/8 cup champagne or other mild vinegar
1/16 cup Balsamic vinegar, does not need to be the good stuff
2 tablespoons Dijon or other delicious prepared mustard.

Add all ingredients to a stainless bowl and whick vigorously until an emulsion is formed. There you go, hand toss with salad of choice. The arugula is a great choice, I really like mache as well.