One of the things I am always looking at is how I can make my Weber Kettle even more versatile than it is straight from the box. I consider the kettle to be one of the best outdoor cooking implements for the budding outdoor cooker who wants to become a serious outdoor cook. But, as you move forward, there are some things that I think can make the kettle work better. Here is my current modification in process for making my kettle work more like an upright smoker and to give me more grate space than the traditional offset coal bed setup. I got this idea from a fellow BBQ Brethren called Woodreaux, who inspired this modification.
First, I wanted to create a larger area for charcoal, to extend my cooking times from an average of 4 hours to closer to 6 or even 8 hours. Woodreaux's method is to put the coals in the bottom of the kettle. I like the idea, but, wanted better air circulation so I got a charcoal grate from a Smokey Joe and placed it on the One-touch vanes like this.
This keeps the charcoals off of the bottom of the kettles while still allowing the vents to work as designed. I plan a couple of modifications to this setup in the form of getting the grate off of the vanes. I have a plan for achieving this goal. After this, I need a method for buffering the heat from being directly on the meat above. I also want a baffle to push the heat out from the center of the kettle and out to the edges of the kettle in an even manner. I decided to use the original 22.5" kettle charcoal grate and added an cast iron pan as shown.
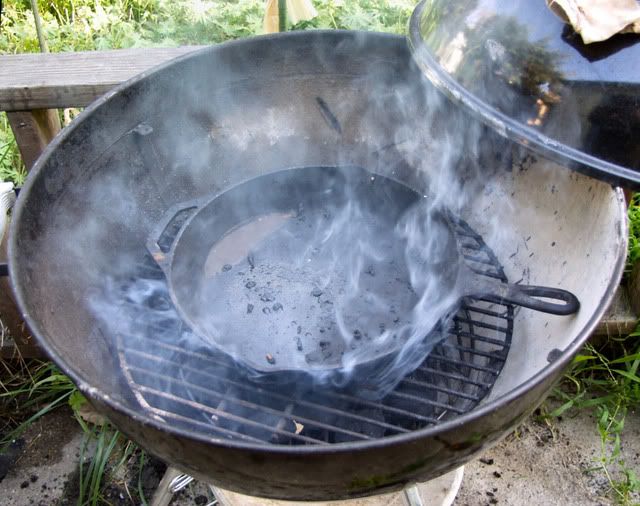
I am going to eventually find an old cast iron skillet that I can saw off the handle and get it a little closer to the edges. But, this thing actually works just fine. I get easily moderated temperatures in the 250F to 285F range with small vent changes. The temps take a while to happen, but, this is what I want, slow steady temperatures that will lock in for long periods of time. The cooking grate goes over this and the meat is cooked as normal for a smoker run.
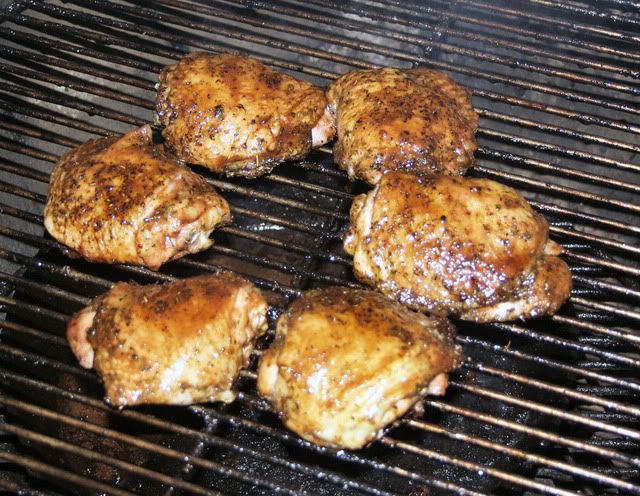
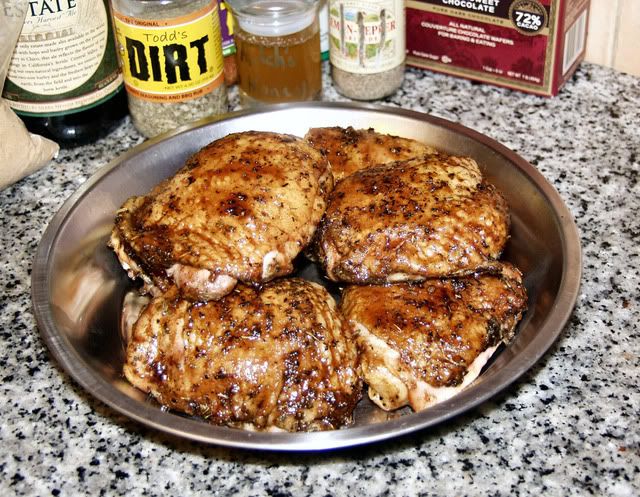
Here is the result of 45 minutes on the cooker, I glazed and was going to let it run for another 20 minutes. At this point, the cooker has been at 270F for 1 hour, it will finish this cook at 270F. Here they are pulled off, very juicy, flavorful with a light smoke flavor, exactly what I look for. I used the same setup recently for baby back ribs, the kettle ran at 225F for four hours with no noticeable variation in temperature. Here is dinner.
So, what's next? I want to make a charcoal grate for the lower rack arrangement, which will hold more charcoal and allow for a very efficient minion burn, I will also modify the grate to not sit on the One-touch vent leaves. I also want to explore a means to get at the charcoal basket for stirring or knocking the ash out. Stay tuned for this...


If you can get your hands on a grate from an 18" kettle give it a try. It might fit under the tabs but still sit above the vent leaves. Avoid drilling holes in the kettle if you can; not for the faint of heart (although I've done it).
ReplyDeleteGood lookin' chicken; I look forward to seeing the next iteration of the grate mod.
I did not try the 18" grate, I might have a line on one. I got a plan that I will probably try this weekend. Thanks for the idea.
ReplyDeleteI saw a post where they just used a couple of fire bricks to offset the heat for smoking in a Weber kettle.
ReplyDeleteI think you just break down and buy a 22 1/2 inch Weber Smokey Mountain and invite us all over for beef ribs. Oh Yeah!
I have a lovely setup for offset cooking, but, I wanted to recover grate space and this idea seems very workable. I would love a WSM 22.5 but, construction slow down/collapse makes that unworkable right now. So far, I am into this for $10.
ReplyDeleteI was thinking you could use a extra large pizza pan with holes drilled out going from small holes near the center to large ones on the outer edges (kind of like the concept of "tuning plates" in an offset) but I like your cast iron idea better. All the mass of the cast iron will act like a heat sink and ensure more steady temps. Great mods, Bob.
ReplyDeleteNice indirect setup. Sure beats just banking the coals off to one side.
ReplyDeleteYou might want to try a couple of fire bricks to corral the briquettes and a 16 inch drip pan as your heat barrier. If you fill it with some water to start with it'll add some moisture and soak up the heat.
Good looking thighs.
Thanks, I do stairmaster and lun...oh, you mean the chicken, thanks. This was a good start, there will be more mods a time goes on.
ReplyDeleteThanks for giving me an idea for the indirect heat set up!
ReplyDeleteSo you used the smokey joe char coal grate for the coals, then you used the smokey joes cooking crate on the top where the normal 22.5 greats would fit? and use a cast iron skillet for the baffle?
Not exactly, I use a Smokey Joe charcoal grate on the bottom of the kettle, then put the 22.5" kettle fire grate over it, in the normal position, place a cast iron skillet over that, then put the 22.5" kettle cooking grate over the skillet. The cast iron is for a heat sink. And to catch drippings.
ReplyDelete